

| Introduction | |
|
latest update : I have already finished my bleuprint website, which shows my portfolio , fireworks tips and tutorials , please visit the website here > http://www.bleuprint.co.nr/ Lufurticous - is a combination of 6 different pieces of artworks all rolled into one , and created entirely in Adobe Fireworks. For us to begin the guide , one must be aware of the Fireworks Basics , where tools are located , or how to achieve making the basic effects. One good section to read would be in the Help Menu of the Fireworks Program , it is highly overlooked by most users , but it contains tons of information about the program, and what it is really capable of. It is very essential that you are aware what the vector and bitmap tools do, adding live filters , combining paths and so forth. One would wonder, how was I able to integrate all parts into one? Or probably how did I create each of the 5 works ( each unique in its own way ). Understanding the Lufurticous means understanding the individual parts , and that is, going back to the first image created. Before the Lufurticous , there were 5 parts , mx2 blueprint-tower metrocdo phantoms , summer sunset and the creation. I cannot create an exact tutorial on how I created each work step by step , for it would take too long, instead , I will discuss issues which are unique to the design. The source file contains the needed fireworks png source files, being used here in this tutorial , and the source files of the Lufurticous and its five designs. |
|
|
MX2 |
|
|
The MX2 : Techniques like inner shadow , punching , flattening
images are a commonplace for advance fireworks users. But one thing
will look closely ,is using the Reshape Area Tool . With this tool ,
you are able to reshape paths , depending on the size of the reshape
area tool. An implementation of this tool would in the " branches "
part of Mx2.
Reshaping : Using the reshape area tool lets you liquify the vectors , enables you to create various effects that also is similar to punching and the union of paths. It is also a good method on creating treelike branches, roots or creating abstract shapes. The only downside would be you need to have a steady hand , on creating the flow on reshaping. On the final lufurticous design , this technique was implemented , in the topmost left portion. To give you an idea on how they are constructed , I will show how a simple circle could transform into an abstract shape.
As you can see, the final result of the reshape process depends on the amount of reshaping you want on your object. On step 9, you see that the duplicate in the image created in step is being reshaped and repositioned creating an entirely different image.There are no rules in here , you could duplicate clones, reshape again ,flatten them and change colors. There are numerous possibilities with this technique, and each time it is exactly different. Feel free to expirement, and try , change the sizes of the reshape area tool , or make them bigger, the final output is up to you. Note : Creating backups ,it is very important that we create backups, not only for vector objects. It is very helpful especially if you decided to undo the effect, and the undo button could no longer help you. For example on step 8 , we may consider it to be a tatoo design , but since a lot of processes have been undertaken after step 8, it is too late going bad. So ? You create duplicates , if they are different objects , you group them to one, separate them into a different layer and hide them from view. This practice is very also important if you are handling bitmaps. Cloning : Cloning here refers to duplicating an object one or more times, and each time it is duplicated ,it creates a different look for your work. It is also a technique used to create different textures using the standard textures being offered in the program. These are some of the practices i follow in this technique.
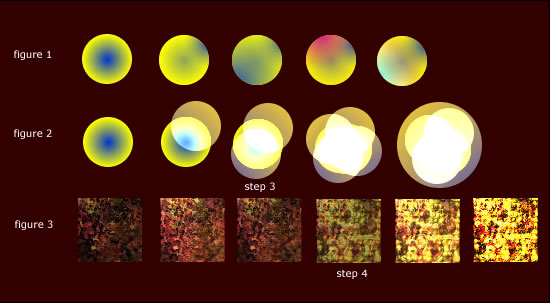
Figure 1 shows how a simple circle with a radial gradient, its original source being replicated several times , each time it is replicated, the position of the gradient has been changed, and or each time one or more settings have been altered. Like in step 2 , the opacity of the gradient ( yellow and blue ) , the yellow being reduced to 56. in this you will notice how one circle, replicated several times, and no change of an objects position , except for its gradient fills will create an entirely new look. Figure 2 shows a combination of using vectors and bitmaps, and making use of grouping objects and replicating again. An alteration of an objects layer mode ( Screen and Multiply for example ) has been showed in step 2. Step 3 shows the original circle, with its duplicates being grouped into 1 object, then duplicated and rotated 90*CCW. Figure 3 deals with textures , using the patterns in fireworks , and or altering the objects texture, like grain, line horizontal could creately an entirely different texture. In step 4, the objects in step 3 have been flattened and applied with a Curves Filter. This is very useful in creating different textures in fireworks using the standard textures given. |
|
| Blueprint Tower | |
|
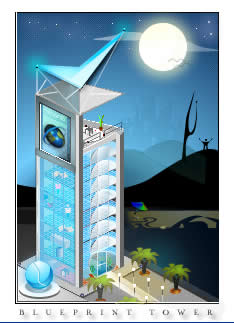
The Blueprint Tower : This work maybe one of the eye straining designs I have ever created. Altough it disqualifies as a pixel based work , becase some of the edges are anti aliased , and in some parts the use of gradients and layer modes. Understanding of lighting and shadows is important here. Always remeber in pixel work, the edges are always hard , some hardcore experts do not make use of gradients, or even filters , they believe that true pixel work requires only these tools , the line ,fill texture , pen and polygon tools ( But in this case, well make an exception, hehe). You should also have a firm understanding on perspective , there are several perspective grids in some fireworks websites which might be able to aid you. Zooming on your work is very important here, it lets you able to look closely on what areas that needed to be edited , for example creating a pixel house on a 100 x 100 canvas size at normal view( 100 percent view ). The more you zoom , the better you can adjust elements in your design, for it is very difficult since the objects are so tiny, unless your have very good eyes like the hubble telescope ( hehe ).
Figure 1 to 3 shows a room in the blueprint tower in normal or 100 percent view. I always zoom further, 300 or more to add more objects in the room , like in figure 4. And you should always group parts that needed to be grouped. The subselection tool is also an important tool on those areas that have already been grouped, or hard to reach areas, it gives you control on the object being subselected. If you want to edit group objects ( with color gradients ) using the subselection tool , it always a good idea to switch back to the pointer tool ? Why ? Simply because you cannot manipulate the fill direction or size using the subselection tool. Although on simple cases , we would normally use the select behind tool. This is extremely imporant especially if you group with numerous objects.
The image is a combination of a group within a group of objects. And ungrouping one object to change something would destroy the image , figure 2 shows that the subselection tool is useless in this scenario. Figure 3 allows you to select objects within a group , let us say we want to change the gradient's direction ? we switch back to the pointer tool to do this.
|
|
| Metro Cdo | |
|
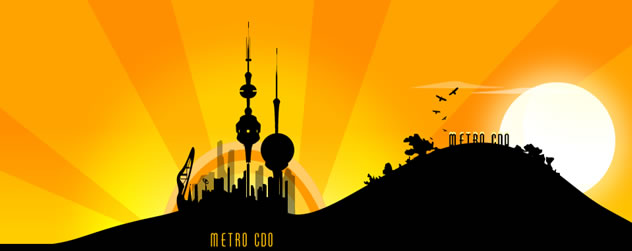
METRO CDO : This was a future concept of how my hometown city would look like , 50 years from now. All elements here are all vectors , and are fully editable. You may have noticed that the city , the hill , trees and buildings have the same fill color, which is black. The foreground part makes heavy use of punching , joining paths techniques, zooming , and drawing curves using the pen tool. This technique of coloring all the foreground part with the same color is widely used among many vector artists nowadays , try finding a picture of a tree , trace its edges using the pen tool ( or for adobe fireworks 8 users, the convert marquee to path could be a time saver in some occassions ) and make a hill using the same fill color as the tree. The position of the object, whether it is located in front or in the back doesnt really matter in this method.
The image you see above shows an abstract design to be placed on top of a hill , the key here is to imagine that all objects are interconnected , and have the same fill color. It is best not use a stroke for your objects to make the edges look smoother.
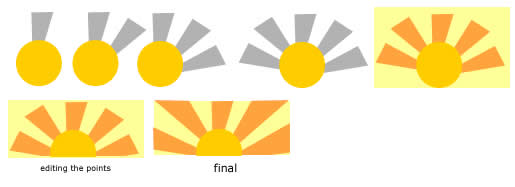
As for the sunburst, the trick here is to create clones for your sun rays and there you edit can its individual points on your own choosing , always remeber that the sun circle should always be on top of all objects , use the bring to front button or for the sunrays, use send to back. In the final image , i edited the points of the sun rays to match with the size of the background rectangle , you may have noticed that the lower right sun ray is totally different from the lower left, to remedy this, just duplicate the other object , and change its direction. For more objects, just select them all and change their direction.
continue to page 2 | view the comments | visit my deviantart portfolio | go to bleuprint website
copyright 2006 Lufurticous mx2 blueprint-tower metrocdo phantoms summer sunset lifetree by blue2x |


